
Vendors at the mall, electronic stores, accessory sections, etc. etc. Many carry phone cases, but a) they’re pretty much all for iPhones (which really sucks if you have a different kind), and b) you could make an even more awesome one yourself!
Since I have a more unique and not as standard model of smartphone, the only cases I could find were plain solid coloured plastic. For a while my phone was protected and decorated with translucent blue. My heart died a bit whenever I saw it and realized how unlike me that case was. So of course I had to add some “me” to it.
Glitter is a way of life. I’m definitely not a “girly-girl”, but still. When I scrapbook or make cards or do practically anything I am obsessed with glitter incorporation. Once I decorated my math homework with glitter. Yeah I’m strange. Anyways… I thought I’d share with you how I made my phone AWESOME!
Supplies:
- Basic phone case
- Mod Podge (craft stores, probably even the dollar store would have it)

- Fine glitter (again, craft or dollar stores)
- Brush to apply it with
- Remove case from phone
- Mix some of the glitter and Mod Podge in a small container (the more glitter, the more glittery the case will be…)
- With the paint brush, apply your mixture in thin coats. NOTE: it will appear white and ugly at first, but it dries clear, so don’t worry, be happy.
- Let individual coats dry.
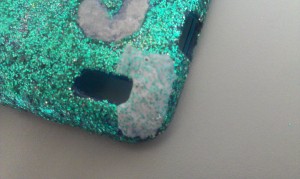
- Then apply more coats.
- Finish with a layer of just Mod Podge
- Let dry COMPLETELY
- Put the case on your phone
- Enjoy, and feel free to brag about your one-of-a-kind DIY phone case!
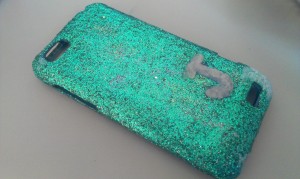
Now I get tons of comments about my phone case, and its super awesome to be able to respond saying that I made it myself.
Get creative!!!
🙂
I recommend trying acrylic paint as well! I’ve painted several phone cases with acrylics and finished them off with varnish. They worked wonderfully 🙂
Cool! Thanks for the additional tip 🙂
You’re welcome! This is a really amazing idea for decorating your phone 🙂
Great DIY 🙂
Comments are closed.