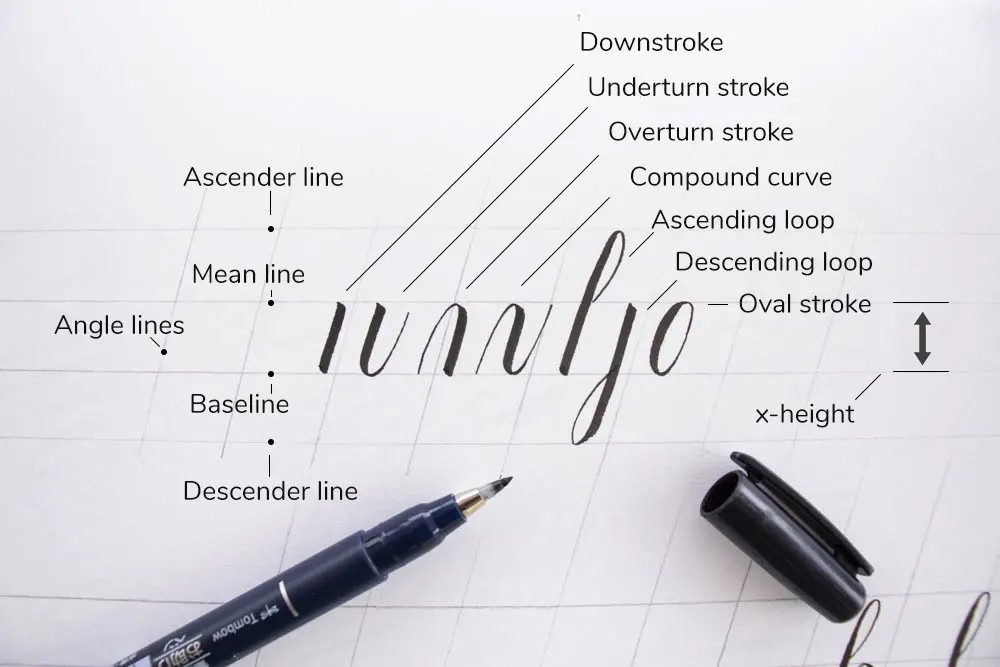
Calligraphy is the art of forming beautiful symbols by hand and arranging them well.
Do you remember learning how to handwrite in cursive in elementary school? It was comprised of the tedious tracing worksheets and exercises for a style of writing that we would never use again!
I have always had a profound fascination with handwriting and I loved being able to connect letters with large loopy strokes. It has been so disappointing to me to learn that handwriting is becoming less and less relevant in today’s world. As I grew older, I began to regret losing this beautiful art form for writing. Upon searching for handwriting tutorials online, I came upon a community of people who shared the same passion as me! There has been a growing interest surrounding lettering and “calligraphy” online. This new form of hand lettering has been coined “modern calligraphy” or “faux calligraphy.” Modern calligraphy is a slightly modified version of traditional calligraphy as it is less strict and can be more creative! Faux calligraphy is lettering done with a pen, marker or any other writing utensil that isn’t a brush or a calligraphy brush.
 Handwriting
Before you begin your path to learning calligraphy, you should start with the basics! Try going back and perfecting your handwriting style! Try using a handwriting guide (like the one on the side!) to practise your cursive. Once you become comfortable writing the alphabet using the guide, try practicing on your own! Remember: for modern calligraphy, you don’t have to write in cursive for every letter. You can write in your own style or by changing up some letters! As you continue to practise, you will find what is most comfortable for you and what you think looks best!
 Faux Calligraphy
Faux calligraphy is the easiest way to becoming a calligraphy master! All you have to do is handwrite normally (just like you practiced!) and add extra strokes for all of your “down-strokes” as pictured. This is difficult to explain but in order to make it appear as if you’ve written the letter with a brush, you have to create the illusion of thick down-strokes. You can achieve this by drawing a line really close to your original down-strokes. You can then fill in the blank space or leave it as is! This gives your cursive the appearance of being calligraphy, hence the name faux calligraphy. This style of calligraphy is definitely the easiest and the most comfortable to learn as a beginner as there is no need for fancy brush pens or calligraphy dip pens. You can easily do this style of writing with a pencil and then trace over it with a pen or marker!
Brush Pens
Now that you have perfected your handwriting and faux calligraphy, it’s time to try using brush pens! Although seemingly daunting and difficult to use, once well-practised, you will find using a brush pen a lot easier for calligraphy. When looking for the right brush pen, make sure to look for one with a firm tip so that the pen doesn’t spread out too much when pressing down on it. The first one I have ever tried was the Pentel Fude Touch Brush Pen. You can find it on Amazon here. I bought one at Recess Shop, a cute stationery store in Inglewood for about three or four dollars. I now have 2 brush pens and I use them religiously. They’re perfect for adding titles to my notes or for writing cards!
Starting out with brush pens can be difficult so I would recommend trying markers first. Markers like the Crayola Supertips are great because they’ve got both a thin point and a thick stroke on the side. Based on how you hold the marker and how much pressure you apply, you can do calligraphy! Here’s an example of lettering done with markers below.
I would highly recommend practicing calligraphy with markers first as it will be easier to transition to using brush pens. Make sure to hold your marker or brush pen about 45 degrees to the paper and don’t hold it upright. This will damage the tip of the pen (especially brush pens). Remember to have thin strokes going up and thick strokes going down. For the first couple of times, you may have to apply a lot more pressure on your down-strokes to differentiate them from your thin up-strokes. Remember that practice makes perfect!

I am by no means an expert on calligraphy, but I thought that I would share my love for calligraphy and the steps I took to learn how to write fancy cursive letters. I am now fairly comfortable using my brush pen and I often do calligraphy using my Mildliner highlighters. Make sure to keep practising and stay committed! It took me 2 years to be able to do calligraphy comfortably and I am still learning. I hope to explore more forms of this beautiful art soon and I hope you fall in love with it as much as I have!
Sources:
