
As back to school approaches many teens go out to buy themselves bigger better backpacks for the new school year. Usually, the backpack one ends up with is, to say the least, boring. Now, that can change.
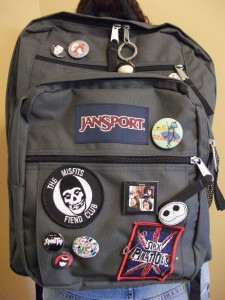
This year, I got Jansport‘s Big Student backpack in grey. Not overly exciting, the bag looks like this:

To add pizzaz to one’s bag takes a little bit of time (mostly spent sewing) and some simple supplies, which can easily be found at the mall.
Things You’ll Need:
-Backpack
-Patches (I got mine at Hot Topic but many malls in Calgary have a store called Murdawg which also sells patches and buttons)
-Sewing kit (matching thread, needle, thimble, scissors, pins)
-Clear nail polish (optional)
-Safety pins (optional)
-Pins/buttons (Along with Murdawg, Chinatown has good selection)
-Keychains
Instructions:
1. Decide where you want to put your patches and pin them into place. Using thread that matches the fabric of the patch sew as close to the edge of the patch as possible (at this step I suggest using a thimble when pushing the needle through as patches can be stubborn). Once done sewing, for added strength, add a dab of clear nail polish to the knot.
2. Pick out the pins you want to use, I think it looks best if your pins are varying in size. I also recommend having an odd amount of pins (3, 5, 7…). Place the pins on the bag, you may have to move them around before you get the look you want. Once you are satisfied with the look, pin the pins into place. You can also use safety pins as decoration. I attached some safety pins to one of my patches, but you can also put them directly onto the bag. Where you put everything is up to you! 🙂
3. Attach keychains to any zipper pulls you may want to. I attached my keychains to the zipper-pulls that didn’t have anything to pull the zipper with. I’d recommend against attaching keychains inside your bag because no one will see them and they’ll just add extra weight (which no one needs when carrying 2-4 textbooks!).
4. Work your bag’s new look! Now if you ever get bored with your bag you can simply switch up the pins and keychains on your bag.
Now you’ll bag will be as unique and awesome as you; good luck!