Hello again everyone! Due to the success of my previous “iPhone 4 tips and tricks” post, I have decided to continue onward with my foray into “tech-help” posts. Today I bring you tips and tricks for Windows 7. As with the iPhone tips, some of these may be common knowledge, but others may have been forgotten or overlooked. It should be noted that some of these tricks are a bit advanced and should be handled with caution. Without further ado, let us begin.
Free the desktop
Click and hold the title bar of the window you wish to keep on the desktop, shake it back and forth quickly and all the other open windows will immediately minimize and save the one you have selected.
Get rid of annoying administrator pop-ups
If you are tired of being asked for permission every time you open a program, this is for you. Go to Control Panel and find User Accounts and Family Safety. Click User Accounts, and then click Change User Account Control settings. From the screen that appears, select what you prefer. I have mine selected on “Never notify me when”.

- Pain in the butt…
“Hack” the Start Menu Search Bar
Note: this doesn’t work on some versions of windows
If you want to be able to use the nifty search bar in the Start Menu for searching the internet as well, in the search box, type “GPEDIT.MSC” (without quotations) and press Enter. Go to User Configuration, then Administrative Templates, then Start Menu and Taskbar. Double-click “Add Search Internet link to Start Menu”, and select Enabled from the screen that appears.

- Search Bar

- Shut Down
“Hack” the Shut Down button
The Shut Down button, as the name would indicate, shuts down your computer. However, it can be customized for other actions, such as restarting, hibernating, or sleeping. In order to do this, right click the Start Button and select Properties. Click the “Power button action” drop-down menu and select your action of choice.

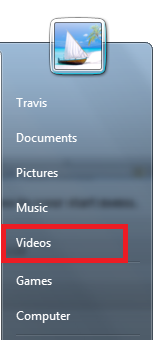
- Videos
Add Videos to the Start Menu
The default Windows 7 Start Menu does not include a link to the Videos folder. In order to rectify this, Right-Click the Start Button and select Properties. Go to the Start Menu tab and click Customize. In the dialog box that appears, scroll to the bottom, find the videos section, and select Display as a Link (or as a menu). Click OK.
Windows Explorer tips
To select multiple files for copying, deleting, or moving, you can use the keyboard to hold down Ctrl while clicking each file with your mouse. Another way is to use check boxes. In Windows Explorer, click Organize, and then select “Folder and search options”. Click the View tab and in advanced settings, scroll down and check the box that says “Use check boxes to select items”. Hit OK

- Windows Explorer
Privacy and Windows Explorer

- Be Secure
Note: This does not work on some versions of Windows
When you search your PC via Windows Explorer you are able to see the most recent searches that have been performed. If your PC has multiple users this could lead to issues (I’m not one to judge…). In the Start Menu’s Search box, type “GPEDIT.MSC” and press Enter. Go to User Configuration, then Administrative Templates, then Windows Components, and select Windows Explorer. Double–click “Turn off display of recent search entries in the Windows Explorer search box” and select Enabled. Click OK.
Set a new Windows Explorer launch folder
When you run Windows Explorer, it always defaults to the Libraries folder, which may be inconvenient. In order to change it, right-click the Windows Explorer icon on the task bar and select Properties. Edit the Target field on the shortcut tab of this dialog box in order to change the default folder. For instance:
%windir%\explorer.exe c:\Folder
Where “Folder” is the name of your desired folder.

- Shortcut
Show all your drives in Windows Explorer
In order to show empty drives, launch Windows Explorer, press the Alt button to reveal the top menu, select tools, folder options, and click the View tab. Go to Advanced settings and uncheck the box next to “Hide empty drives”

- Empty Drives
Control the taskbar notification area
Right-click the taskbar, select Properties, and from click Customize. You can now control which icons appear on the taskbar and when.
See and launch taskbar thumbnails without a mouse
Hold Windows key and tap T at the same time to select a thumbnail. If you want to select it specifically, hold Windows key and tap 1, 2, 3, etc.

- Thumbnails
Run multiple copies of the same application from the taskbar
Hold down the shift key and click the icon.
The return of the Quick Launch bar!
Windows 7’s new taskbar has effectively banished the Quick Launch bar, however, if you want it back, right-click the taskbar and choose Toolbars, then select New Toolbar. You’ll be asked to select a folder where the new toolbar should ‘live’. In the Folder text box, enter this:
%userprofile%\AppData\Roaming\Microsoft\Internet Explorer\Quick Launch
After this is down, click select folder, and boom! Quick Launch. Right-click the taskbar again and in the popup menu, remove the check next to “Lock the taskbar”. Right-click Quick Launch and remove the checks next to Show Text and Show Title. Now drag the three vertical dots to expose the icons.

- Quick Launch
Window control
Click on the bar of a window and drag it to one side of your screen. It has now been halved.
More Window control
Windows key + Left: docks current window to the left side of the screen.
Windows key + Right: docks current window to the right side of the screen.
Windows key + Up: maximizes and/or restores foreground window.
Windows key + Down: minimizes active window.
Cooler looking alt-tab
Hold the Windows Key and hit Tab, you now have a 3d alt-tab interface.

- Windows + Tab
Well those are enough tips for today. I might post some more later.
Cheers

Nuuu! My image died =(
Comments are closed.